
3×4 vs 4×4 Membrane Switch Module Arduino Key Differences
3×4 vs 4×4 Membrane Switch Module Arduino Key Differences
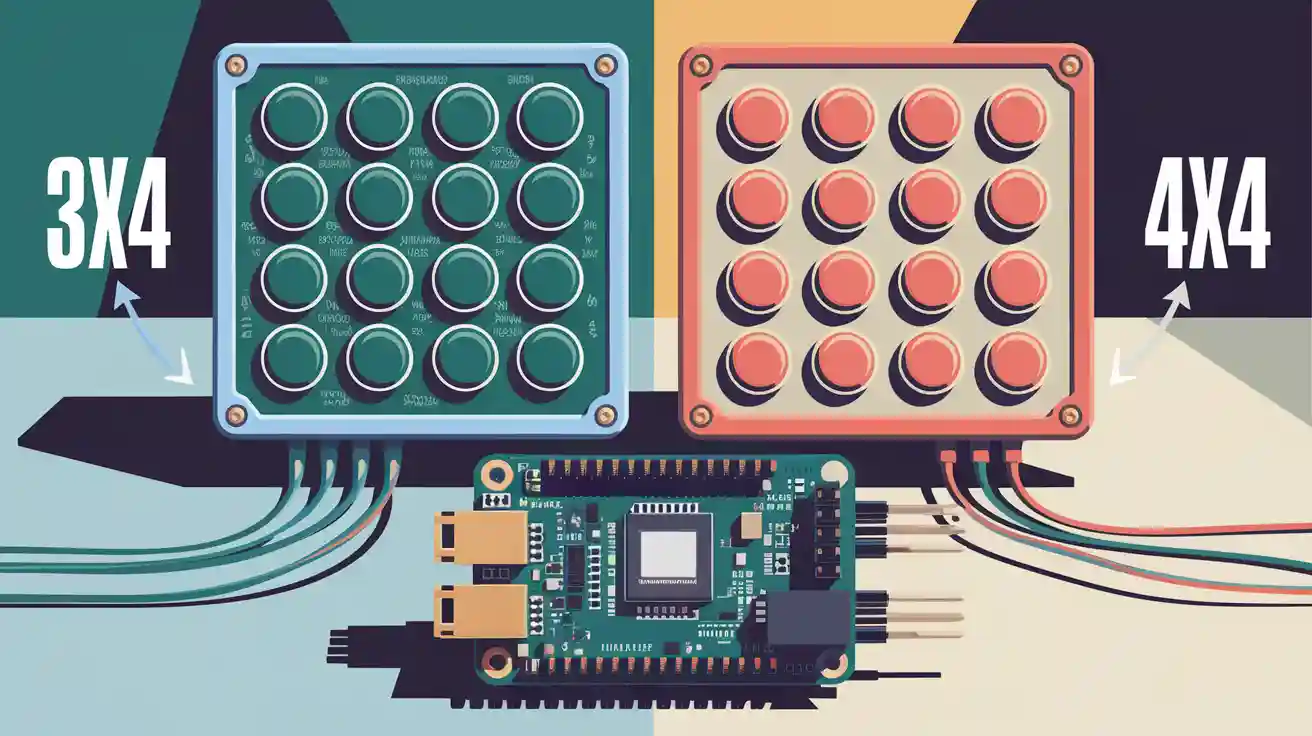
When you look at a 3×4 and a 4×4 membrane switch module arduino, you find some key differences. The 3×4 module has 12 keys. The 4×4 module has 16 keys. The wiring and pin layouts are not the same. Coding is different because each module uses its own matrix. These things change how you pick the right module for your project.
Tip: Count how many inputs you need before you choose a membrane switch module arduino.
Key Takeaways
- The 3×4 membrane switch has 12 keys. It uses 7 Arduino pins. This makes it easier to use. It also saves pins for other parts.
- The 4×4 membrane switch has 16 keys. It uses 8 Arduino pins. This gives you more buttons. You can use it for advanced controls and features.
- Wiring and coding are not the same for both modules. You must match the rows and columns in your code. Make sure they fit your hardware.
- Use the 3×4 module for simple projects. It is good for number entry and easy menus. Use the 4×4 module for harder projects. It helps if you need letters or more functions.
- Pick the keypad that fits your project. The right choice makes your Arduino project easier. It also makes it more fun.
Membrane Switches Specs Overview
Membrane Switch Layout
When you look at a membrane switch module arduino, you see a thin, flexible keypad. The 3×4 module has three rows and four columns. The 4×4 module has four rows and four columns. Each button sits at the intersection of a row and a column. You press a button, and the module connects the row and column under that key.
Tip: You can easily mount these modules on a breadboard or panel. Their flat design saves space in your project.
Membrane Switch Key Count
You need to know how many keys you get with each module. The 3×4 membrane switch module arduino gives you 12 keys. The 4×4 version gives you 16 keys. Here is a quick comparison:
| Module Type | Rows | Columns | Total Keys |
|---|---|---|---|
| 3×4 | 3 | 4 | 12 |
| 4×4 | 4 | 4 | 16 |
If you want to enter numbers only, the 3×4 module works well. If you need more options, like letters or extra functions, the 4×4 module fits better.
Pinout For Module Arduino
You connect each row and column to a pin on your Arduino. The 3×4 module uses 7 pins. The 4×4 module uses 8 pins. You must match each wire from the membrane switch to a digital pin on your Arduino board. Here is a simple example:
- 3×4 module: Connect 3 row wires and 4 column wires to 7 digital pins.
- 4×4 module: Connect 4 row wires and 4 column wires to 8 digital pins.
Note: Fewer pins mean easier wiring and more free pins for other sensors or modules.
Wiring and Integration Differences
Required Pins Differences
You need to know how many pins each module uses before you start wiring. The 3×4 membrane switch module arduino uses 7 pins. You connect three row wires and four column wires to your Arduino. The 4×4 module uses 8 pins. You connect four row wires and four column wires.
| Module Type | Row Pins | Column Pins | Total Pins Needed |
|---|---|---|---|
| 3×4 | 3 | 4 | 7 |
| 4×4 | 4 | 4 | 8 |
If you have a small Arduino board, you might want to save pins for other sensors or modules. The 3×4 module helps you do that. The 4×4 module gives you more keys, but you need one extra pin.
Tip: Always check your Arduino board’s available digital pins before you choose a membrane switch module.
Circuit Setup Differences
You set up the circuit by connecting each wire from the membrane switch to a digital pin on your Arduino. The wiring pattern follows a matrix scheme. Each button sits at the crossing point of a row and a column. When you press a button, the row and column connect, and your Arduino detects the key press.
Here is a simple wiring example for a 3×4 module:
3x4 Membrane Switch Module Arduino Wiring:
Row 1 -> Pin 2
Row 2 -> Pin 3
Row 3 -> Pin 4
Col 1 -> Pin 5
Col 2 -> Pin 6
Col 3 -> Pin 7
Col 4 -> Pin 8
For a 4×4 module, you add one more row wire:
4x4 Membrane Switch Module Arduino Wiring:
Row 1 -> Pin 2
Row 2 -> Pin 3
Row 3 -> Pin 4
Row 4 -> Pin 5
Col 1 -> Pin 6
Col 2 -> Pin 7
Col 3 -> Pin 8
Col 4 -> Pin 9
You can use jumper wires to connect the membrane switch module arduino to your board. The wiring looks neat and flat because the module is thin. You do not need extra resistors or components for basic use. The matrix scheme makes it easy for your Arduino to scan each key.
If you want to make your circuit more complex, you can add LEDs or buzzers to show when a key is pressed. You can also use breadboards for quick testing. The 4×4 module needs more space on your breadboard because of the extra wire.
Note: Double-check your wiring before you power up your Arduino. A wrong connection can stop your keypad from working.
Coding for Membrane Switch Module Arduino
Code Differences
When you start coding for a membrane switch module arduino, you notice some differences between the 3×4 and 4×4 modules. The main change comes from the number of rows and columns. You need to set up the keymap and pin connections in your code. For a 3×4 module, you use a smaller keymap. For a 4×4 module, you use a larger keymap with more keys.
Here is a simple example for a 3×4 keypad:
const byte ROWS = 3; // Three rows
const byte COLS = 4; // Four columns
char keys[ROWS][COLS] = {
  {'1','2','3','A'},
  {'4','5','6','B'},
  {'7','8','9','C'}
};
byte rowPins[ROWS] = {2, 3, 4};
byte colPins[COLS] = {5, 6, 7, 8};
For a 4×4 keypad, you add one more row and update the keymap:
const byte ROWS = 4; // Four rows
const byte COLS = 4; // Four columns
char keys[ROWS][COLS] = {
  {'1','2','3','A'},
  {'4','5','6','B'},
  {'7','8','9','C'},
  {'*','0','#','D'}
};
byte rowPins[ROWS] = {2, 3, 4, 5};
byte colPins[COLS] = {6, 7, 8, 9};
You must match the number of rows and columns in your code to your hardware. If you use the wrong numbers, your keypad will not work as expected.
Tip: Always check your keymap and pin assignments before uploading your code.
Library Support
You can use the Keypad library to make coding easier. This library works with both 3×4 and 4×4 modules. You only need to change the row and column numbers in your setup. The library helps you scan the keys and read input without writing complex code.
Here is how you include the library and create a keypad object:
#include <Keypad.h>
Keypad keypad = Keypad(makeKeymap(keys), rowPins, colPins, ROWS, COLS);
You can read which key is pressed with a simple function:
char key = keypad.getKey();
if (key) {
  Serial.println(key);
}
The Keypad library supports many Arduino boards. You do not need extra drivers or software. You can find examples and documentation online. This makes the membrane switch module arduino easy to use for beginners and advanced users.
Note: If you use other libraries, check if they support both 3×4 and 4×4 keypads. Most popular libraries work with both types.
| Feature | 3×4 Module | 4×4 Module |
|---|---|---|
| Keypad Library Support | Yes | Yes |
| Code Complexity | Low | Medium |
| Example Code Available | Yes | Yes |
You can finish your project faster when you use the right library. You spend less time debugging and more time building.
Use Cases Experience
3×4 Membrane Switch Applications
The 3×4 module is good for simple projects. You use it when you only need number input. It works well for password systems. For example, you can make a door lock that needs a code. Many students pick this module for school projects. It is easy to connect and program.
You can use the 3×4 keypad to move through menus. You can scroll options on an LCD screen. The keypad helps you pick items or change settings. People use it in homemade calculators or timers. Its small size saves space on your breadboard. You also get more free pins for other parts.
Tip: Choose the 3×4 keypad for easy controls. It is great for entering numbers or using basic menus.
Common 3×4 Applications:
- Password entry systems
- Simple calculators
- Timers and counters
- Menu navigation for small devices
4×4 Membrane Switch Applications
The 4×4 module is best when you need more buttons. It gives you extra keys for letters or special commands. You can use it for advanced password systems. These systems need both numbers and letters. Hobbyists use the 4×4 keypad for home automation panels. It is also used for custom remote controls.
You can build a menu system with more features. The extra keys let you add shortcuts or options. For example, you can make a music player controller. You can have play, pause, next, and previous buttons. The 4×4 keypad is good for games or security panels. It works well for projects that need complex input.
Note: Pick the 4×4 keypad if you want more than numbers. It lets you add special features and more controls.
Common 4×4 Applications:
- Advanced password and security systems
- Home automation control panels
- Game controllers
- Multi-function remote controls
| Project Type | 3×4 Keypad | 4×4 Keypad |
|---|---|---|
| Numeric Entry | ✅ | ✅ |
| Menu Navigation | ✅ | ✅ |
| Letters/Symbols | ❌ | ✅ |
| Complex Controls | ❌ | ✅ |
Pick the keypad that fits your project. The 3×4 module is for simple designs. The 4×4 module is for projects with more input choices.
Pros and Cons For Module Arduino
When you pick a 3×4 or 4×4 keypad, you need to think about what is good and bad about each one. Each module has its own benefits for your Arduino projects. You should check the features, the limits, and how each one fits your project.
Summary Table
Here is a simple table to help you choose:
| Feature | 3×4 Keypad Pros | 3×4 Keypad Cons | 4×4 Keypad Pros | 4×4 Keypad Cons |
|---|---|---|---|---|
| Key Count | 12 keys, simple input | Fewer options | 16 keys, more functions | Uses more pins |
| Pin Usage | Saves Arduino pins | Limited for complex input | Supports advanced input | Takes up extra space |
| Coding | Easy to program | Less flexible | More features possible | Slightly harder to code |
| Size | Compact, fits small boards | Not for big projects | Good for large projects | Larger footprint |
| Use Cases | Great for numbers, menus | Not for letters/symbols | Handles letters/symbols | May be overkill for simple tasks |
Tip: Pick the 3×4 module if you want easy controls. Pick the 4×4 module if you need more keys for extra features.
Pros of 3×4 Keypad:
- It saves space on your breadboard.
- It uses fewer pins, so you have more for other parts.
- It is easy to set up and code.
Cons of 3×4 Keypad:
- It only works for numbers and a few symbols.
- It is not good for projects that need many inputs.
Pros of 4×4 Keypad:
- It gives you more keys for harder controls.
- It lets you use letters, symbols, and extra functions.
- It is good for big projects like security panels.
Cons of 4×4 Keypad:
- It needs more pins and more space.
- Coding can be harder if you are just starting.
You should pick the one that matches your project’s needs. If you want a simple password system, the 3×4 keypad is enough. If you want a controller with many functions, the 4×4 keypad is better. You can always switch later if your project changes.
When you choose a membrane switch module arduino, think about your project’s needs. The 3×4 keypad gives you simple input and saves pins. The 4×4 keypad offers more keys for advanced controls. You should pick the 3×4 for basic tasks like password entry. Select the 4×4 if you want extra features or symbols. Review your design and count your required inputs before you decide.
Tip: The right keypad makes your Arduino project easier and more fun.

Rubber Melting Temperature – Values for Common Rubber Types
Rubber is widely used in modern manufacturing because it offers flexibility, durability, and reliable performance under different conditions. Engineers rely on rubber materials for seals, keypads, insulation parts, and vibration control components. However, temperature performance is one of the most important properties to consider when selecting a rubber material for any product design. Many people ...
Backlit Membrane Switches – High-Quality Backlit Keypads
We provide reliable backlit membrane switches with long service life, stable backlight, and customizable design to fit your device control panel. What are backlit membrane switches? Backlit membrane switches are low-profile control interfaces that combine printed circuitry with integrated lighting. They allow users to see and operate equipment in low-light or dark environments. A backlit ...

Membrane Switch with LED, Customized LED Membrane Switches
Our LED membrane switches provide bright, even backlighting, long lifespan and reliable performance for control panels in dark environments. What are LED membrane switches? LED membrane switches are advanced user interface panels that combine a flexible membrane circuit with integrated light sources. The structure looks simple from the outside. Inside, it is a layered system ...
Contact us online