How to Make an On-Off Switch Circuit Using a Push Button
How to Make an On-Off Switch Circuit Using a Push Button
You can easily build a switch on and off circuit using a push button, even if you have never tried electronics before. Most beginner projects use one of three basic switch types:
- Single-pole single-throw (SPST)
- Double-pole single-throw (DPST)
- Single-pole double-throw (SPDT)
You only need simple tools and components to get started.
Key Takeaways
- Collect important parts such as a push button, LED, and power source before you begin your circuit project. – Follow simple steps to connect your push button and LED. Make sure to stay safe by turning off the power when you connect wires. – Use a multimeter to test your circuit after you put it together. This helps you check if it works the right way.
Switch On and Off Circuit Basics
Components and Tools
You need only a few basic parts to build a switch on and off circuit. Here is what you should gather before starting:
- Push button
- MOSFET (for advanced switching)
- 555 timer (for touch switch circuits)
- Relay (for controlling larger loads)
- LED (to show the circuit state)
- Power source (like a battery or adapter)
For tools, you will find these helpful:
- Screwdriver
- Wire strippers
- Multimeter
You see push button switch circuits in many devices, such as computers, crosswalks, telephones, vending machines, and household appliances.
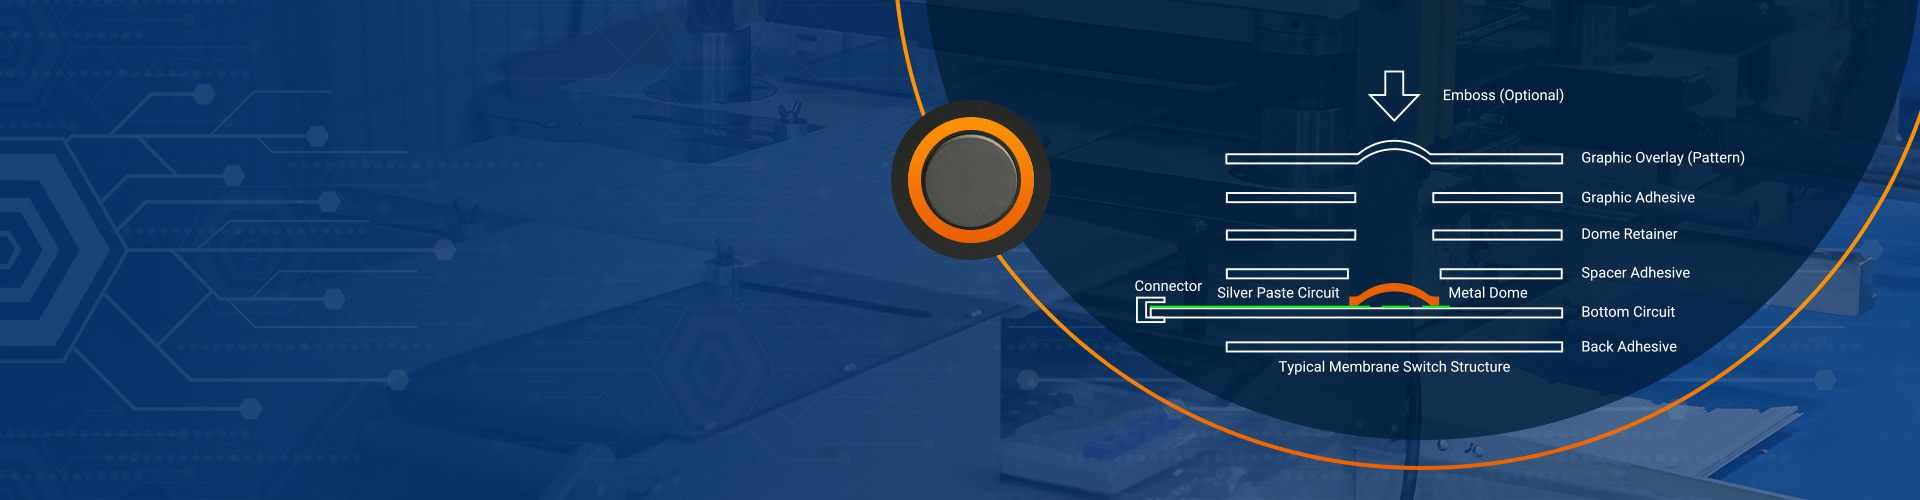
Circuit Diagram Overview
A switch on and off circuit lets you control the flow of electricity. When you press the push button, you close the circuit and allow current to flow. When you release the button, the circuit opens and stops the current. The table below shows how different switches work:
| Type of Switch | Functionality |
|---|---|
| Momentary Switch | Closes the circuit only while pressed, allowing current to flow temporarily. |
| Latching Switch | Toggles the circuit state with each press, maintaining the current flow until pressed again. |
A simple touch switch circuit uses a 555 timer or MOSFET to sense your touch and change the circuit state. You can see a basic touch switch circuit diagram below:
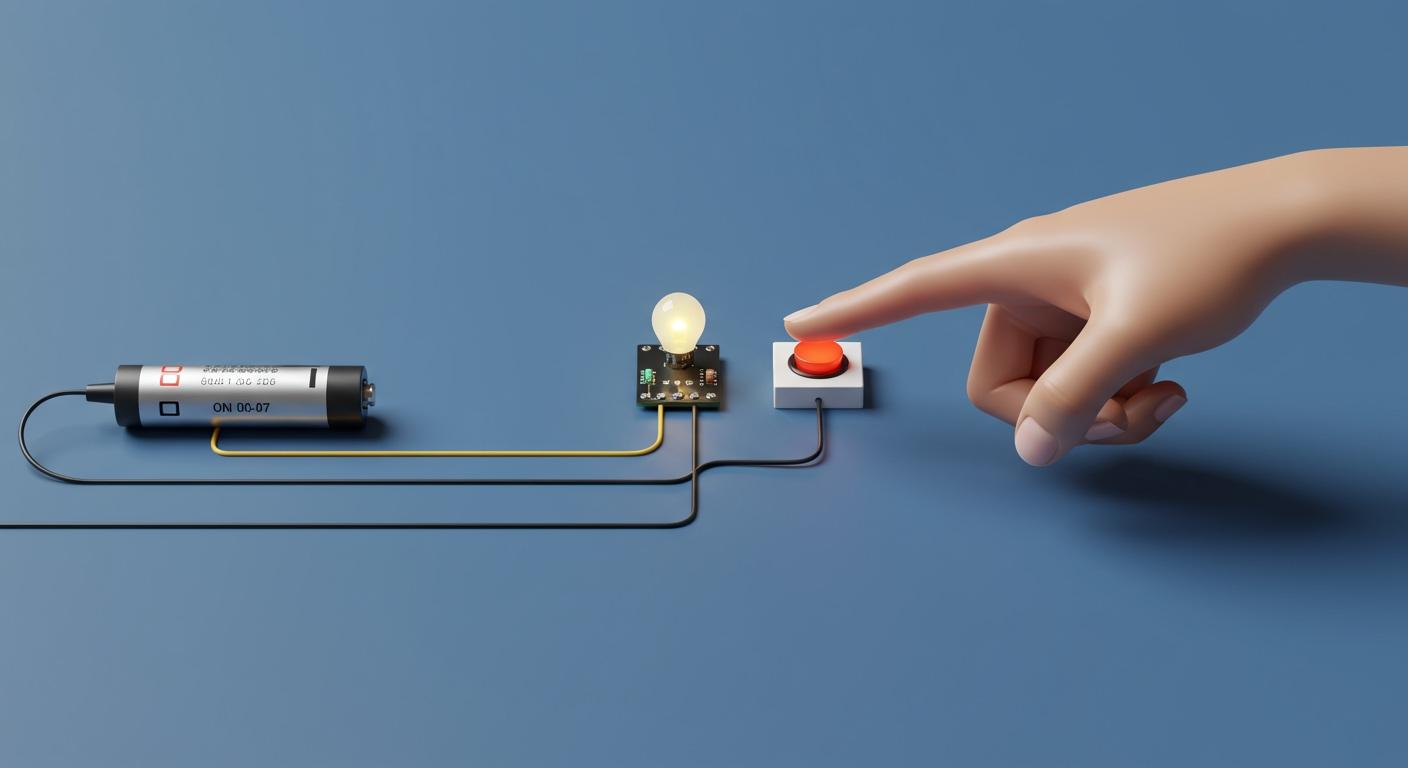
[Power] --- [Push Button] --- [LED] --- [Ground]
Each part has a role. The push button or touch pad acts as the switch. The LED shows when the circuit is on. The power source supplies energy. The MOSFET or 555 timer can make the touch switch circuit diagram more sensitive or automatic.
Tip: Push button switches are versatile and durable, but touch switches save space and work well in high-density setups.
Build Steps for Simple Touch On and Off Switch Circuit

Building a simple touch on and off switch circuit can help you control devices with just a push or a touch. You will find these steps easy to follow, even if you are new to electronics. This guide covers both a basic push button switch on and off circuit and a simple touch switch circuit using a 555 timer or MOSFET.
Connect the Push Button
To assemble a basic switch on and off circuit, follow these steps:
- Select a power source that matches your device’s voltage requirements.
- Attach one contact pin of the push button switch to the positive terminal of the power source.
- Connect the other contact pin of the switch to one wire of the device you want to control, such as an LED.
- Link the other wire of the device to the negative terminal of the power source.
- Attach one pin of the LED to either the common (C) or normally open (NO) terminal of the switch.
- Connect the other LED pin to the positive or negative terminal of the power source, depending on your circuit design.
Tip: Always disconnect the power before wiring your switch. Double-check your connections against your circuit diagram. If you feel unsure, especially when working with higher voltages, ask a professional for help.
Add Power and Load
You need to connect your load, such as an LED or small motor, to the switch on and off circuit for it to work properly. Here is how you do it:
- Run a wire from the NO terminal of the push button to your device. This setup ensures the device activates only when you press the button.
- If you want the load to stay on until you press the button again, use the NC terminal instead.
- Always include a resistor in series with an LED to prevent excess current and protect the component.
- Use reliable wires and secure connections to avoid loose contacts.
Safety Note: Wear gloves and safety glasses when working with circuits. Work in a well-ventilated area to avoid exposure to fumes from soldering or other chemicals.
Simple Touch Switch Circuit
You can build a simple touch switch circuit using a 555 timer or a MOSFET. This type of switch, sometimes called a touch activated switch circuit or touch plate switch circuit, lets you turn devices on and off by touching a metal plate or pad.
To build a simple touch on and off switch circuit:
- Connect the power source to the VCC and GND pins of the 555 timer or MOSFET.
- Attach a metal plate or touch pad to the input pin of the timer or gate of the MOSFET.
- Connect the output pin of the timer or MOSFET to the device you want to control, such as an LED.
- Add a resistor and capacitor as shown in your circuit diagram to set the sensitivity and timing.
- Complete the circuit by connecting the device’s other terminal to ground.
Common Mistakes: Avoid over-designing your simple touch switch circuit. Incorrect wiring can cause the circuit to fail. Make sure capacitors are charged and connected properly, or the circuit may not turn off as expected.
Testing Your Circuit
After building your switch on and off circuit or simple touch switch circuit, you should test it to make sure it works:
- Connect a multimeter to the switch terminals.
- With the switch open, the multimeter should show a high resistance or ‘OL’.
- Press the push button or touch the plate. The multimeter should beep or show low resistance.
- Test the circuit under load by connecting your device and checking if it turns on and off as expected.
- If the device does not respond, review your wiring and check for loose connections.
Pro Tip: Reliable sources for components include online platforms like AliExpress and Home Depot. Prices vary, so compare options before buying.
| Source | Price Range | Notes |
|---|---|---|
| Global Sources | $0.03 per piece | Bulk orders (10,000+) |
| Made-in-China | $0.01 to $100 | Wide range of features |
| AliExpress | $7.67 to $20+ | Model and features affect price |
| Home Depot | $10 to $150 | Many types available |
A simple touch on and off switch circuit or touch plate switch circuit gives you a modern way to control devices. You can use these circuits in lamps, toys, or DIY projects. The switch on and off circuit and touch activated switch circuit both offer reliable performance for beginners and hobbyists.
If you run into problems, check your connections and make sure all components are in the right place. Testing each part step by step will help you find and fix issues quickly.
Troubleshooting and How It Works
Circuit Operation
You control the circuit by pressing or letting go of the switch. When you press the push button, the circuit closes. This lets current move through the circuit. When you let go, the circuit opens and stops the current. The way the circuit acts depends on the resistor type:
- With a pull-up resistor, the input pin stays high if the switch is not pressed. Pressing the switch connects the pin to ground, so the signal goes low.
- With a pull-down resistor, the input pin stays low if the switch is not pressed. Pressing the switch connects the pin to power, so the signal goes high.
- Momentary switches only work while you press them. Maintained switches keep the circuit on until you press them again.
Touch switches work in another way. They sense your touch using capacitance or resistance. Here is a quick comparison:
| Type of Touch Switch | Principle of Operation |
|---|---|
| Capacitive Touch Switch | Detects changes in capacitance when a conductive object approaches or touches the sensor. |
| Resistive Touch Switch | Relies on physical contact that lowers the resistance between two conductive surfaces. |
A capacitive touch switch finds your finger by sensing a change in the electric field. This change switches the circuit on or off.
Common Issues and Fixes
You might have some problems when building a switch circuit. Here are the most common issues and how to fix them:
- Buttons can stick or jam because of dirt or rust. Clean the switch or get a new one if needed.
- If the circuit works sometimes or not at all, the contacts or wires may be worn out. Check all wires and connections.
- Sparking or arcing can happen with high voltage. Use the right switch and do not overload the circuit.
- Cracks or broken parts can stop the circuit from working. Look for damage and replace broken pieces.
If your LED does not turn on, try these steps:
- Check every wire to see if it is loose.
- Use a multimeter to test for voltage in the circuit.
- Look at the switch for any damage or wear.
- Tighten loose wires and check the circuit again.
Tip: Always check your wiring before turning on the circuit. Careful checking can stop most problems.
You now know how to make on-off switch circuits with push buttons and touch switches. Trying out different parts helps you learn the basics, solve problems, and fix circuits. If you want to try harder projects, look at these helpful resources:
| Resource Type | Name | Description |
|---|---|---|
| Software | KiCad | Open-source EDA software |
| Course | Analog Circuit Design | Intermediate analog circuit course |
| Software | Tinkercad | Online platform for basic circuit design |
FAQ
How do you know if your push button switch works?
You can use a multimeter. Set it to continuity mode. Press the button. If you hear a beep, your switch works.
Can you use a touch switch for any device?
You can use a touch switch for low-voltage devices like LEDs or buzzers. For high-power devices, you need a relay or MOSFET.
What should you do if your LED does not light up?
Check your wiring first. Make sure the LED faces the right way. Test the battery. Replace the LED if it still does not work.

How Long Does Keyboard Last? Average Lifespan Guide
Understanding how long does keyboard last is not just about numbers—it’s about how design, usage habits, and environmental conditions come together over time. Whether you’re working with a membrane keyboard, a mechanical unit, or a custom membrane keyboard built for industrial use, lifespan varies widely based on real-world factors. How long do keyboards last? Most ...

Difference between Mechanical Keyboard and Membrane Keyboard
Choosing between different keyboard technologies is no longer a simple matter of preference. As user expectations continue to evolve—especially in gaming, office productivity, and industrial control systems—the underlying structure of a keyboard plays a decisive role in performance, longevity, and overall user satisfaction. Understanding the difference between mechanical keyboard and membrane keyboard allows buyers and ...
Top Advantages of Using an LGF Membrane Switch in Modern Electronics
Electronics have advanced rapidly over the years. The buttons and controls people use every day have also quietly advanced. Today, thin panel-based controls are replacing old, bulky buttons in almost every industry, and for good reason. Even Lighting Across Every Key Older backlit panels always had that annoying problem of bright spots near the light ...
Contact us online